Stap 3: Schrijven van de code
We moeten schrijven van de code, zodat het hele ding kan werken.
Er zijn een paar software beschikbaar om te schrijven van de benodigde code voor het maken van de Raad van bestuur uitvoeren, met inbegrip van maar niet beperkt tot: Atmel Studio, de Arduino IDE en de Visual studio. Ik gebruikte de meer populaire Arduino IDE.
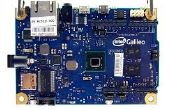
Stap 1. Sluit uw Galileo bord om de voeding en het verbinden met uw pc via USB.
Stap 2. Open de Arduino IDE en maak een nieuw project.
Stap 3. Ga naar tools optie en kies Intel Galileo. Als u die optie selecteren planken manager niet vinden kan.
Stap 4. Plak de volgende code in uw projectpagina.
/*Code for MQ-2 Smoke Sensor Circuit Built with an Galileo Board*/<br>
const int sensorPin= 0;
const int buzzerPin= 12;
int smoke_level;
void setup() { Serial.begin(115200); //sets the baud rate for data transfer in bits/second
pinMode(sensorPin, INPUT);//the smoke sensor will be an input to the galileo
pinMode(buzzerPin, OUTPUT);//the buzzer serves an output in the circuit
}
void loop() { smoke_level= analogRead(sensorPin); //arduino reads the value from the smoke sensor
Serial.println(smoke_level);//prints just for debugging purposes, to see what values the sensor is picking up
if(smoke_level > 200){ //if smoke level is greater than 200, the buzzer will go off digitalWrite(buzzerPin, HIGH);
}
else{ digitalWrite(buzzerPin, LOW);
} }
<p>Step 5. Go to the sketch option and click verify.</p><p>Step 6. Go to sketch option again and select upload.</p><p>Your device is now ready to test and run.</p>
